Puffy in the cloud
It's worth to note that before even provisioning a server I did the full setup for the first time on my tiny i386 OpenBSD current box. This experience was invaluable, allowing me to test the whole setup in peace without Chinese automated hacking scripts hitting the server :)
So what's the use case? Lots of storage and a fun box to play around for me. I saw vultr.com mentioned multiple times on the OpenBSD mailing lists and finally decided to give it a shot. The fact that vultr offers SATA storage plans sealed the deal.
Ok. I'm crazy & intend to run snapshots on the server. Why? First of all that's what I'm running on my daily box and the ability to test stuff out locally before going live into production is really great. Secondly I do trust the OpenBSD developers a lot, security issues in the base OS are far and between so the ports system is a bigger attack vector then the base OS even with a bigger window between updates. This server will run a lot of internet facing applications including the php ownCloud installation. I prefer to run the latest version from ports and to patch the base OS on a per-snapshot basis or just porting the most important fixes myself. Finally I do intend to play around with this box. Running the new httpd is a great way to contribute to the project by testing the software in a real life use case. It also means that I will be able to test amd64 patches instead of just working with a puny i386 machine.
Enough said. Let's get down to business.
Buying a server from vultr.com had some slight perturbations for me. They do a pre-check authorization against your card for $2,5 USD. My bank thought that the transaction might be fraudulent and decided to block my card until I clear the transaction with them. I must say that at first I expected a software glitch as I was expecting a $25 USD charge from them and fired a ticket on their support channel after a first talk with my bank. This doesn't sound like a great first impressions right? True. Though they quickly wiped away my doubts with their amazing support. I rarely had to wait more than five minutes for a systems administrator reply on the site. Rather quickly the whole issue was explained, my card was unblocked and I was free to provision a new server.
Which I did. The SATA storage plans are available only in one zone but I'm not really worried about data locality. I won't go over the whole OpenBSD installation. That's both too simple & much better covered in the official OpenBSD documentation. Though it's worth to note two specific things I encountered during the installation.
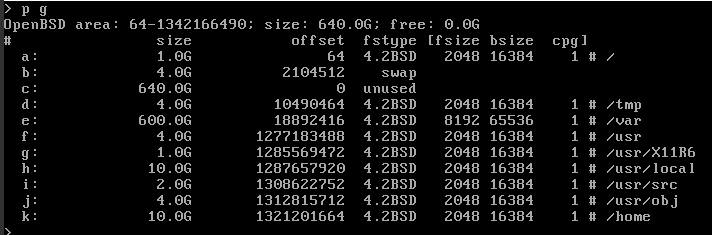
The first one is my plan to partition the drive. I wanted 600 G for ownCloud storage and enough for other partitions that I don't feel limited while playing around with the system. Based on my experiences with the i386 installation I have on this box, some defaults felt too tight. I decided to bump those up to 4G. The vultr instance has 2 G of ram so I also decided to up the swap space to twice that size. You might notice a X11R6 partition there. No I will not be running X on that server but I did install the xenocara sets as a lot of ports tend to expect the X system being available even if it's not ever running. The most important parts of the partitioning plan is 600 G for /var as that's where postgres & ownCloud will store it's data & 10 G for the /home partition - that's my have fun sandbox.
You can see my final layout on the screen-shot below.
The second thing that's worth a mention is what happens after you reboot your fresh installation. Nothing special but I did spent some time debugging why the hell is my server booting again into the bsd.rd kernel, if you're in that position you have to go to your vultr.com management panel and remove the install.iso from your server. After that step your box will boot properly.
Ok, so the box is up. You went through man afterboot as usual and configured your SSH keys. What's next? Possibly a lot of automated attempts to guess your SSH passwords from the Chinese IP address space.
I hate my servers being hammered that way. In the past I usually set up a fail2ban script monitoring SSH login attempts. OpenBSD has a much better way of handling it though so you won't even have to play around with that software. The great folks at BSDNow.tv provided an amazing pf tutorial which effectively blocks down those attempts. I highly recommend you go ahead, read & implement it before going forward.
Please remember one thing. This blog post is not a tutorial. This is a transcript of my experiences setting up the service at the time of this writing. OpenBSD ships with amazing documentation and you should use it. For our ownCloud instance we will need both PostgreSQL (my preference) and ownCloud itself. You should take the time to go through pkg-readmes shipped with those packages before doing anything to your system.
- /usr/local/share/doc/pkg-readmes/owncloud-8.0.2
- /usr/local/share/doc/pkg-readmes/postgresql-server-9.4.1p1
According to the above let us first create the font directory:
mkdir -p /var/www/usr/share/locale/UTF-8/then a copy of our hosts & resolv.conf files:
cp /usr/share/locale/UTF-8/LC_CTYPE /var/www/usr/share/locale/UTF-8/
mkdir -p /var/www/etcWe also want to serve our cloud through https only. For this reason we will generate a self signed certificate using LibreSSL. You can of course use a signed certificate from a CA authority but since I'm hosting a server for myself & my wife then I didn't bother to sign up for one.
cp /etc/hosts /var/www/etc/hosts
cp /etc/resolv.conf /var/www/etc/resolv.conf
$ openssl genrsa -out server.keyLibreSSL nicely defaults to a 2048 bit key, most tutorials you will find on the web still contain a flag for a 1024 bit key. OpenBSD has sane defaults so when in doubt - use them.
Now that we have a key we need to sign a cert.
$ openssl req -new -x509 -days 365 -key server.key -out server.crtKeys ready, so put them in a place that we can later on access from our httpd.conf.
You are about to be asked to enter information that will be incorporated
into your certificate request.
What you are about to enter is what is called a Distinguished Name or a DN.
There are quite a few fields but you can leave some blank
For some fields there will be a default value,
If you enter '.', the field will be left blank.
-----
Country Name (2 letter code) []:PL
State or Province Name (full name) []:
Locality Name (eg, city) []:
Organization Name (eg, company) []:
Organizational Unit Name (eg, section) []:
Common Name (eg, fully qualified host name) []:cloud.example.com
Email Address []:adam.wolk@koparo.com
# cp server.crt /etc/ssl/cloud.crt
# cp server.key /etc/ssl/private/cloud.crt
ownCloud can work with multiple storage back-ends. I'm personally a fan of PostgreSQL so that's the back-end I will install for the ownCloud setup. It should be fairly trivial to adjust to your type of preferred back-end. So let us get PostgreSQL installed:
# pkg_add postgresql-serverTo re-iterate for the last time. You should consult the pkg-readme for this package. The basic steps needed to go forward with ownCloud is to create a default database:
# su - _postgresql
$ mkdir /var/postgresql/data
$ initdb -D /var/postgresql/data -U postgres -A md5 -W
You should now alter your /etc/rc.conf.local script to have PostgreSQL start along with the system
# cat /etc/rc.conf.localAdditionally starting the server now (if you don't want to reboot):
ntpd_flags=
pkg_scripts="postgresql"
# /etc/rc.d/postgresql startGo back to the _postgresql account and prepare a database for ownCloud. You can use LibreSSL to generate a random password for the ownCloud account as demonstrated below:
postgresql(ok)
$ openssl rand 16 -hex
d5a148be21b8f643105759af71bea852
$ psql -U postgres
Password for user postgres:
psql (9.4.1)
Type "help" for help.
postgres=# CREATE USER owncloud WITH PASSWORD 'd5a148be21b8f643105759af71bea852';
CREATE ROLE
postgres=# CREATE DATABASE owncloud TEMPLATE template0 ENCODING 'UNICODE';
CREATE DATABASE
postgres=# ALTER DATABASE owncloud OWNER TO owncloud;
ALTER DATABASE
postgres=# GRANT ALL PRIVILEGES ON DATABASE owncloud TO owncloud;
GRANT
Great, the database is ready. Now it's time to install ownCloud, php-fpm & the php PostgreSQL drivers.
# pkg_add owncloud
# pkg_add php-fpm
# pkg_add php-pgsql
# pkg_add php-pdo_pgsql
When prompted I had to pick the 5.5 series of the above php libraries. Depending on when you're performing your installation, the current default might have changed. The above commands will pull down some php libraries that we want to enable. In order to do so create symlinks as demonstrated below. Before you ask, pkg_add told you about it when the package was installed and you can always check pkg-readmes / man pages before randomly pasting commands from this blog. Who knows maybe one of them is a trap?
ln -s /etc/php-5.5.sample/zip.ini /etc/php-5.5/zip.iniOwncloud really wants to work with UTF-8 and it will complain if php.ini is set to a different charset. So edit /etc/php-5.5.ini and make sure that default_charset = "UTF-8" is uncommented (doesn't have a ; at the beginning of the line).
ln -s /etc/php-5.5.sample/gd.ini /etc/php-5.5/gd.ini
ln -s /etc/php-5.5.sample/curl.ini /etc/php-5.5/curl.ini
ln -s /etc/php-5.5.sample/intl.ini /etc/php-5.5/intl.ini
ln -s /etc/php-5.5.sample/mcrypt.ini /etc/php-5.5/mcrypt.ini
ln -s /etc/php-5.5.sample/opcache.ini /etc/php-5.5/opcache.ini
ln -s /etc/php-5.5.sample/xmlrpc.ini /etc/php-5.5/xmlrpc.ini
ln -s /etc/php-5.5.sample/pdo_pgsql.ini /etc/php-5.5/pdo_pgsql.ini
ln -s /etc/php-5.5.sample/pgsql.ini /etc/php-5.5/pgsql.ini
We are almost there I promise. For the impatient, all that's left to do is to configure httpd, finalize the ownCloud installation and set a cronjob for it.
You might have heard that OpenBSD has a new httpd daemon. It so happens that the author of the software wrote a small github wiki describing how to set it up with ownCloud. We will be basing our configuration heavily on that file so go read it first.
The main changes we made are:
- disable HTTP completely (we only want HTTPS)
- up the upload limit from 513M to 10GiB (don't ask me, ask my wife)
- we point at the TLS certificates directly in case we want some other sites in the future using different key
- we alter "*/data" to "*/data*" and "*/config" to "*/config*" as the previous rules didn't actually catch people trying to access critical files by name
The /var/www/forbidden workaround is no longer required as correctly pointed out by Bryan Steele on twitter. The block policy is now available for httpd as stated by httpd.conf(5) manual page.mkdir -m 0 /var/www/forbidden
You should of course save that config as /etc/httpd.conf.
Finally alter your /etc/rc.conf.local to start both php-fpm and httpd. We will also start it manually in case you don't want to reboot ;)
# cat /etc/rc.conf.localIn order to start manually issue:
ntpd_flags=
httpd_flags=""
pkg_scripts="postgresql php_fpm"
/etc/rc.d/php_fpm startOk now go to the host you configured in your /etc/httpd.conf file. Your browser will probably give you a big scary warning because we self signed the certificate. Just confirm that it is actually your cert and add an exception. If you did everything correctly you should see a login/configuration page.
/etc/rc.d/httpd start
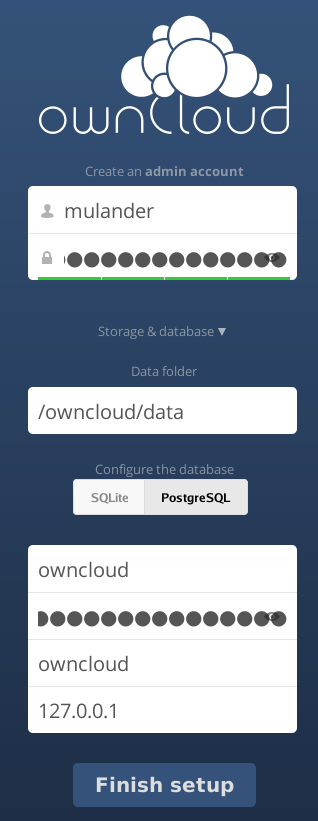
Go ahead and pick a username for the cloud administrator. Leave the data folder to it's default location. Pick PostgreSQL as the database backend and enter the credentials we picked in previous steps (owncloud username & database plus our random openssl generated password). You probably noticed that I'm entering 127.0.0.1 as the DB host. No need to provide a name there and risk that it doesn't resolve to what you expect. Done? Finish setup!
Ok so everything is almost done. You should login to your new cloud and go to myowncloud.example.com/index.php/settings/admin and confirm that no configuration problems were found.

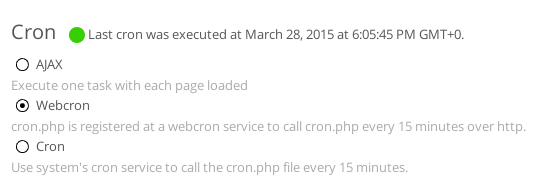
This is the finish line. The only thing left is a cron job for the service. ownCloud wants to perform periodical maintenance on a set interval. By default it will execute a job each time a page is accessed which is not an optimal solution. Instead we will set a cron job to run for the website every 15 minutes. If you did your homework and looked at the pkg-readmes then you already know everything about it ;) If not go ahead and read this final bit.
We already know that httpd runs chrooted in /var/www. The pkg-readmes for ownCloud state that only Webcron will work inside a chroot so that's the option we will use. There is a tiny difference we will introduce. We completely disabled serving the site over HTTP so our cron job needs to fetch content over HTTPS. Now the ftp command which is used to do that in the cron job performs certificate validations and it will fail as our certificate is self signed. So we need to tell it to don't bother checking our cert. We can do this by adding a -S dont flag to the ftp command.
We first need to edit the cron job for our service, httpd by default runs as user www so enter the following command to edit it's cron job:
crontab -u www -eAnd add the following cron entry
*/15 * * * * /usr/bin/ftp -S dont -Vo - https://myowncloud.example.com/owncloud/cron.php > /dev/nullRemember to change myowncloud.example.com to your actual domain.
The final step is trivial and requires changing the owncloud setting in the admin panel from AJAX to Webcron.
That's it. You can verify that your cron is properly ticking by refreshing that page and seeing if the last cron execution is updated. Additionally if you check /var/cron/log you can see the executions performed by your OpenBSD cron and any errors that it might encounter.
Got this far? Congratulations! You're done with a fully functional (as far as I am aware) ownCloud setup on an OpenBSD machine. Go ahead, make accounts and test the service. Most of all, have a ton of fun with it!
